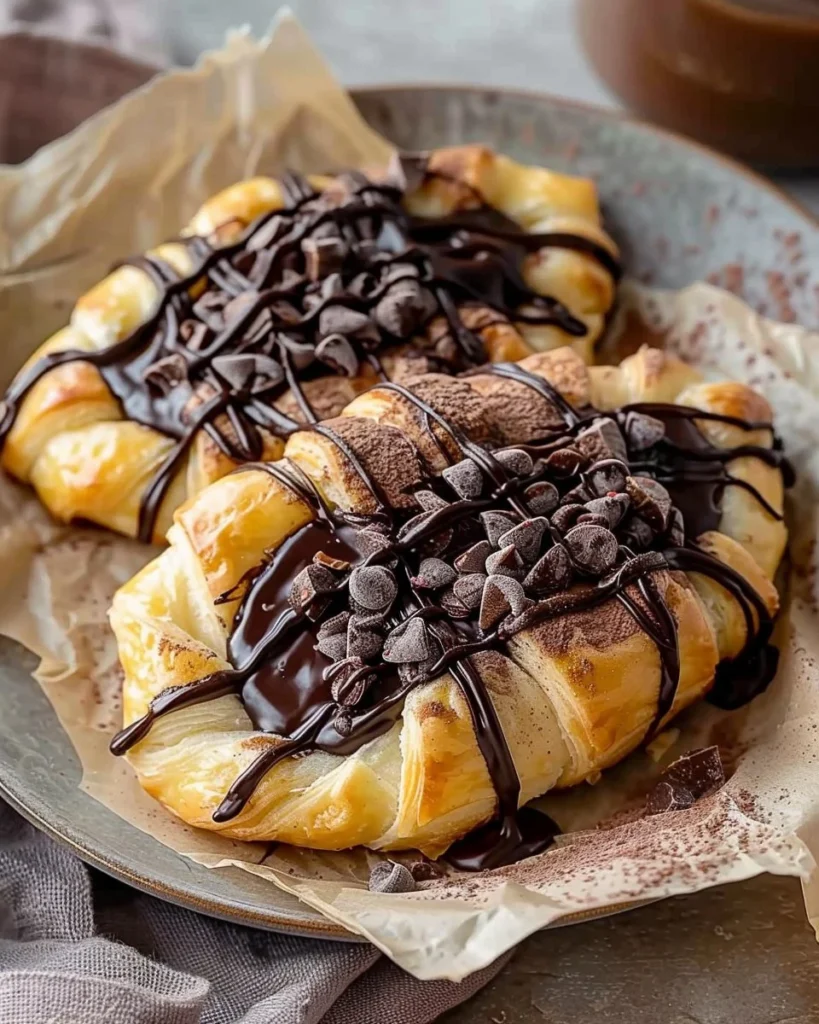
Chocolate Cream Cheese Danishes: Your New Go-To Comfort Recipe
The first time I tackled making Chocolate Cream Cheese Danishes, I had a full-fledged meltdown. Picture this: flour everywhere, dough that looked more like a science experiment gone wrong, and some very questionable noises coming from the oven. My husband walked in, surveyed the chaos, and said, “Well, at least it smells like an explosion in a bakery.” That was a decade ago, and now I make these beauties whenever I need a pick-me-up or a reason to bribe my kids into doing their chores. Trust me on this; I’ve tried and failed—and tried again—until I figured out the secret to making these pastries work every single time.
What began as an exercise in humility has turned into a cherished recipe that warms not just the belly, but the heart. So, if you’re wondering what to make when life throws you a curveball (or the kids just won’t stop bickering), I’ve got the perfect solution—Chocolate Cream Cheese Danishes. They’re sweet, a bit indulgent, and loaded with chocolate. Seriously, what’s not to love?
Why This Matters
Okay, let’s be real. We all hit those days when we need a little something to lift our spirits. These danishes are not just about the food; they’re like a warm hug wrapped in pastry. When you’re too tired to think but still want to impress someone (or just treat yourself without feeling guilty), these are the ticket. They’re the culinary equivalent of putting a "Do Not Disturb" sign on your door and enjoying some well-deserved me-time. Or, they might just solve your mid-afternoon snack crisis. Whatever the case, they pack a punch of comfort that any bowl of cereal can’t match.
Here’s a little inside scoop: I usually whip these up on weekends when we have nothing but a chilly afternoon ahead and maybe a movie marathon planned. The kids love helping out, and it becomes a lovely bonding moment amidst the chaos of everyday life. Plus, the kitchen fills with the incredible aroma of melting chocolate, and no one can resist that!
Before You Start
- Shortcuts are golden: If you don’t feel like making puff pastry from scratch (who does?), don’t panic! Store-bought puff pastry works like a charm. Seriously. You’ll save time and energy—trust me on this.
- Small hands, big hearts: If your toddler decides to “help,” hand them a bowl of leftover cream cheese filling while you work. Let them feel involved, and maybe you’ll buy yourself a few minutes of undisturbed dough-rolling.
- Coffee or tea: Go ahead and pour yourself a cup while you get going. Cooking is more fun with a little caffeine in hand, and it might make the entire process feel a bit more luxurious. You’ll thank me later.
- Expect a mess: We’re baking, people! Flour and powdered sugar are going to dust your countertops, hands, and perhaps even the family dog. Go with the flow. Life’s messy, and so is baking.
Ingredients List with Personal Notes
- 1 package puff pastry (thawed) (I use the Jus-Rol brand because, frankly, they make life way easier when you’re feeling lazy.)
- 8 oz cream cheese, softened (I make sure it’s nice and soft, which means looking at it lovingly for about an hour on the counter.)
- 1/2 cup powdered sugar (Or more if you’re feeling wild. I mean, why not?)
- 1 tsp vanilla extract (A little splash adds a depth of flavour that really ties everything together.)
- 1/2 cup semi-sweet chocolate chips (I’m a sucker for Lindt, but any good chocolate will do, of course.)
- 1 egg (beaten) (For brushing—it helps that golden sheen that makes everything look undeniably gorgeous.)
- A pinch of salt (Don’t skip this. It elevates the sweetness to something ethereal.)
- Powdered sugar for dusting (Because who doesn’t love that final touch that says, “I’m fancy and I know it”?)

The Step-by-Step with Stories
Step 1: Preheat the Oven
Practical Instruction: Preheat your oven to 400°F (200°C).
Why This matters: Preheating ensures that your pastries puff up perfectly and have a nice golden crust.
My personal hack: While that’s heating, let’s be honest — sneak a few chocolate chips. It’s basically a prerequisite, right?
Step 2: Prepare Your Filling
Practical Instruction: In a bowl, mix your softened cream cheese, powdered sugar, vanilla, and a pinch of salt until smooth.
Common mistake here: Gritty filling isn’t cute. Make sure the cream cheese is mega soft. Seriously, I once tried to skip this step, and trust me, my guests had a less-than-dazzling experience.
Anecdote: My best friend Julie usually shows up at this point, and she’s like my baking cheerleader. She’s got this ridiculous dance to perform while mixing, and honestly, it’s hard not to giggle and follow her lead.
Step 3: Roll Out Your Pastry
Practical Instruction: Lightly flour your surface and roll out the puff pastry into a larger rectangle.
The sensory cue: You know it’s ready when you can see the faint lines of the parchment from the pastry—it’s a thing!
A tiny story: This is where my kids usually get a little too enthusiastic, so I have to remind them gently that "yeet-ing" dough isn’t a thing. It’s a balancing act of fun and keeping it farm-to-table, if you know what I mean.
Step 4: Cut the Pastry
Practical Instruction: Cut the pastry into squares, about 4 inches each.
If you’re multi-tasking: Take a moment to pour another cup of coffee. You deserve it!
Step 5: Fill the Squares
Practical Instruction: Place about a tablespoon of the cream cheese mixture and some chocolate chips in the center of each square.
Why this step matters: Less is more here; overstuffing will lead to a melty situation that looks like an explosion.
Common mistake here: This is when I went overboard the first few times. Imagine a volcano of cheese—save yourself the heartache (and cleanup).
A little story: The kids always argue over who gets more chocolate chips. I like to tell them that it’s just a game of “who can handle the most sweetness,” and we giggle, which I guess helps alleviate the competitive spirit—sometimes.
Step 6: Fold and Seal
Practical Instruction: Fold each square over to form a triangle and press the edges to seal.
Pro-tip: A bit of beaten egg brushed over the edges goes a long way in making those seals stick!
Anecdote: Every time I do this, I think about how my grandma showed me her version of sealing chocolate croissants. It was her best-kept secret, and honestly, nothing beats a little nostalgia sprinkled with flour.
Step 7: Brush with Egg Wash
Practical Instruction: Brush the tops with that beaten egg.
Why this step matters: This gives them that gorgeous, golden sheen.
Step 8: Bake
Practical Instruction: Bake for about 15-20 minutes or until golden brown.
The sensory cue: You’ll know it’s ready when you see those perfect puffy shapes and that intoxicating aroma wafting through your home.
Step 9: Cool & Dust
Practical Instruction: Let them cool slightly and then dust with powdered sugar.
Why you shouldn’t skip this: It adds a touch of elegance. I learned this the hard way when I served them un-dusted once, and my picky cousin turned up his nose. No pressure, right?
Troubleshooting Real Life
If you end up burning the bottoms, trust me, it happens. Don’t panic; let them cool, then cut off the burnt parts. Top it off with more whipped cream or extra chocolate sauce, and you’ll forget it ever happened.
If the dough decides to fight back and keeps tearing, sprinkle a bit of flour on the surface where you’re rolling it out. Sometimes it just needs a little love to cooperate.
If you’re out of chocolate chips, get creative! Use dried fruits or nuts for a different flavor profile. No chocolate? No problem.
If the kids come in all at once, five minutes before you’re ready to serve, and suddenly demand dinner—just store them in a warm space until the storms pass. Call it ‘The Great Demand of the Children’ and proceed as necessary.
The Serving Story
I serve these danishes on my grandma’s old platter that looks like it just walked off a vintage film set. I tell the kids that it’s ‘the best’ and they roll their eyes but love the tradition. You can serve them warm with a side of strong coffee or a little dollop of cream, but honestly, sometimes we eat them straight from the baking tray while perched on the couch, probably watching something we shouldn’t be since it’s not the most peaceful of scenes.
You know what’s even better? Leftovers. They taste even more decadent after a night in the fridge, as the chocolate gets all gooey again by just heating them up for a few seconds in the microwave. Perfection!
When I Make This
I usually whip these up on a rainy Saturday afternoon. Full disclosure: I’ll sometimes try to squeeze in some laundry, but inevitably I’ll get sidetracked as I fan myself with flour dust. Half the fun is how everyone hangs around while they bake; the anticipation in the air is palpable. The kids inevitably get restless, and it’s like herding cats, but I wouldn’t trade these moments for the world. We enjoy the first bites still warm, half-sitting around the living room table, probably giggling over some nonsense.
The Conversational Close
This recipe has seen me through rainy days, lazy Sundays, and the occasional kitchen disaster. It might not be perfect, but it’s real, and it’s mine. Baking may be a little intimidating at first, but I promise it’s well worth the effort—it brings me joy even when I flub a few steps along the way.
I’d love to hear if you make it—tag me, share your stories, and let’s get a conversation going! What’s your go-to comfort food? Mine changes quite often, but lately, it’s these Chocolate Cream Cheese Danishes. Now get out there and start making your own baking memories!

Chocolate Cream Cheese Danishes
Ingredients
Method
- Preheat your oven to 400°F (200°C).
- In a bowl, mix the softened cream cheese, powdered sugar, vanilla, and a pinch of salt until smooth.
- Lightly flour your surface and roll out the puff pastry into a larger rectangle.
- Cut the pastry into squares, about 4 inches each.
- Place about a tablespoon of the cream cheese mixture and some chocolate chips in the center of each square.
- Fold each square over to form a triangle and press the edges to seal.
- Brush the tops with the beaten egg.
- Bake for about 15-20 minutes or until golden brown.
- Let them cool slightly and then dust with powdered sugar.