Homemade Kool-Aid Licorice Ropes: A Sweet Throwback to Simpler Times
The first time I tried to make homemade Kool-Aid licorice ropes, I thought I could just wing it. Spoiler alert: I can’t wing it. I ended up with a pot of sticky goo that stuck to everything—my hands, my hair (don’t ask), and definitely the countertop. Honestly, I’m pretty sure part of that failed attempt is still lurking in a crack somewhere. My daughter walked in and took one look at the chaos before bursting into laughter. “Well, Mom,” she said, “at least you know how not to make candy.” That was five years ago, and now, every time I make these chewy delights, I can hear her giggles behind me. These little gems have become our go-to rainy-day project, and they never fail to whip us back to childhood. Let me save you from that first awkward try.
Why This Matters
Here’s the deal: Kool-Aid licorice ropes are not just candy; they’re a nostalgia trip wrapped in a chewy, fruity twist. When life gets stressful (maybe you’ve been to work, or perhaps dealing with teen drama), sometimes all you need is the sweet comfort of a reliable treat that takes you back to simpler times. These licorice ropes can pull everyone into the kitchen, and trust me, you’ll find yourself smiling more than you expected. Plus, the kids will love it—what’s not to love about bright colours and sweet flavours?
Before You Start
- Ingredients matter: If you only have one flavour of Kool-Aid, go with it! Don’t let anyone tell you cherry isn’t a valid licorice option (who even are they?).
- Tools that help: A silicone spatula makes stirring a lot easier. If you’ve got one hiding in a drawer, grab it.
- Kid meltdowns: If little ones start a “Daddy’s not here, why can’t we eat the goo?” meltdown at step three, give them a scoop of ice cream and keep going. Ice cream fixes everything.
- Drink while cooking: If you feel like you need a little pick-me-up while making these, pour yourself a cup of your favourite brew—trust me, it helps.
Ingredients
- 1 cup water (I use filtered because tap water doesn’t go with this magic)
- 2 packets of Kool-Aid (I usually pick Tropical Punch because it’s cheery, but you can do whatever floats your boat)
- 2 cups granulated sugar (I buy the store brand, because we’re all about saving the pennies)
- 1/2 cup light corn syrup (because the dark stuff really messes with the colour, in my experience)
- 2 teaspoons unflavoured gelatin (don’t ask about the time I used the flavoured stuff… that was a regretful day)
- 1 teaspoon salt (just a pinch, because who wants salty licorice?)
- 1 teaspoon lemon juice (pushing the balance a bit; life’s too short not to play around with flavours)
- Optional: extra Kool-Aid for dusting or food colour (just remember, a little goes a long way)

Step-by-Step Instructions
1. Prepare the Mixture
Practical Instruction: In a medium saucepan, combine the water, Kool-Aid, granulated sugar, corn syrup, and salt. Stir everything together, keeping the heat low to avoid any aggressive boiling.
Human Insight: Why this step matters: combining the dry ingredients first makes sure they dissolve without clumps. If you don’t, you’ll be fishing out sugar lumps later, which isn’t fun.
Anecdote: My youngest used to think this looked like potions class in Harry Potter—she would stand next to me with a wooden spoon pretending to be casting spells. It was a fun time until she accidentally knocked over a perfectly good measuring cup full of sugar.
2. Add the Gelatin
Practical Instruction: Sprinkle the gelatin over the mixture and stir it in gently.
Human Insight: Common mistake here: adding it all at once can lead to clumping. Just sprinkle a little at a time and give it a good mix.
Anecdote: The first time I did this, I ended up with the infamous ‘gelatin blob’. My husband still jokes about that mishap. He’s got a knack for picking the worst times to remind me.
3. Heat It Up
Practical Instruction: Turn the heat to medium, stirring continuously, until all the sugar and gelatin have dissolved—should take about 5-7 minutes at most.
Human Insight: The sensory cue: you’ll know it’s ready when the mixture looks glossy and moves easily without grittiness.
Anecdote: My son always sidles up to the stove during this step; he claims he can ‘feel the magic’ happening. Now, I can’t say no to that kind of enthusiasm!
4. Add the Lemon Juice
Practical Instruction: Once it’s all melted down and syrupy, give it a quick stir with the lemon juice and remove from heat.
Human Insight: Quick note: lemon juice helps to balance the sweetness and the fruity flavor, which is crucial unless you want something that resembles syrupy gummy bears.
Anecdote: I once forgot this step and served syrupy ropes to my daughter’s friends—talk about an awkward afternoon.
5. Pour Into Molds
Practical Instruction: Carefully pour your mixture into your preferred molds—don’t even think about licking the spoon until you’re done.
Human Insight: If you’re worried about sticking (and who wouldn’t be?), just lightly grease the molds with a bit of cooking spray.
Anecdote: I learned this the hard way. The first batch? Yeah, they lived in the mold indefinitely. My daughter said it was a “great way to build patience.”
6. Chill and Cut
Practical Instruction: Let your licorice cool in the fridge for about 2-3 hours. Once set, cut them into strips.
Human Insight: The secret nobody tells you: the longer you let them chill, the chewier the texture.
Anecdote: My grandpa used to always say, “Good things come to those who wait.” I used to roll my eyes, but with these, he’s not wrong.
7. Dust with Kool-Aid (Optional)
Practical Instruction: If you want to get a little fancy, sprinkle a bit of Kool-Aid powder over the cut strips to give them a nice coating.
Human Insight: This step really is optional, but it gives them a great zing that might just make you feel like a candy genius.
Anecdote: I tried this once without telling anyone, and my husband was convinced I’d turned into a candy prodigy. Spoiler alert: I didn’t.
Troubleshooting Real Life
- If you burn the bottom: First off, that’s a total bummer. If it only sticks to the bottom, pour out what you can, add a splash of water, and simmer on low to loosen the burnt bits.
- If you’re out of corn syrup: Honey or sugar syrup can work in a pinch. But, full disclosure, it’ll affect the flavour.
- Need to pause? Just cover the pot and take a break. It’ll keep without a fuss.
- If it’s just not working: Honestly, don’t feel guilty about ordering takeout. Sometimes life is just too much!
How to Serve It
I usually serve these in a glass jar—still refuse to buy those fancy containers. A jar makes it feel rustic and homey. And if you get creative with your attributes, these can proudly sit on your kitchen counter.
Sometimes we pair them with popcorn movie nights, but honestly? We’ll just eat them straight from the pan. Leftovers (if there are any) seem to somehow taste better by the next day, thanks to the slight mingling of flavours. Trust me on this; they’re like fine wine that only gets better.
When I Make This
I tend to whip these up on rainy Saturdays because those cozy days scream for a kitchen project. While that pot of magic is bubbling away on the stove, I’ll often find myself multitasking—folding laundry or catching up with an episode of The Great British Bake Off. We eat these while catching up on whatever’s on TV, all cuddled up on the couch. Cleanup takes a bit—there are always sticky spots to scrub—but honestly, I wouldn’t trade this time for anything.
The Conversational Close
This recipe has definitely seen me through more than a few stressful moments in life—child tantrums, family game nights, and even some late-night cravings (shhh). It might not be perfect, but it’s mine, and the memories it creates are worth every drop of sticky syrup. If you give this a try, I’d love to hear how it goes! Tag me if you post about it or just enjoy your licorice quietly. What’s your go-to comfort food? Mine seems to change like the weather, but lately? It’s definitely these Kool-Aid licorice ropes.

FAQ
Q: Can I use a non-Kool-Aid brand?
A: Sure, why not? Just stick to a powder drink mix and you’re golden.
Q: How long do these last?
A: If they last that long, they should be fine for about a week—though I doubt they’ll hang around that long!
Q: Can I freeze them?
A: In theory, yes, but the texture may change. I recommend keeping them in the fridge.
Q: Can I make them without corn syrup?
A: You can try honey or make a sugar syrup, but I can’t guarantee the same texture.
So, what do you think? Ready to channel your inner candy genius? Let’s go!
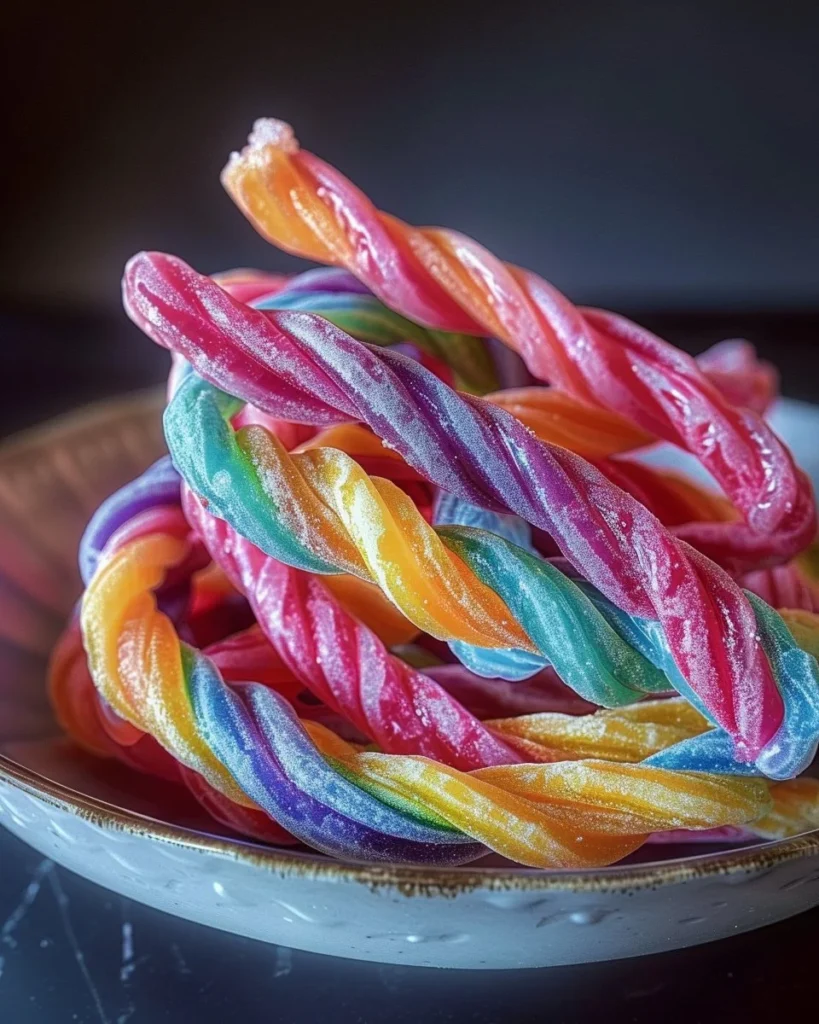
Homemade Kool-Aid Licorice Ropes
Ingredients
Method
- In a medium saucepan, combine the water, Kool-Aid, granulated sugar, corn syrup, and salt. Stir everything together, keeping the heat low to avoid any aggressive boiling.
- Sprinkle the gelatin over the mixture and stir it in gently.
- Turn the heat to medium, stirring continuously, until all the sugar and gelatin have dissolved—this should take about 5-7 minutes.
- Once it’s all melted down and syrupy, give it a quick stir with the lemon juice and remove from heat.
- Carefully pour your mixture into your preferred molds—don’t lick the spoon until you’re done.
- Let your licorice cool in the fridge for about 2-3 hours. Once set, cut them into strips.
- If desired, sprinkle a bit of Kool-Aid powder over the cut strips for added zing.