THE EMOTIONAL HOOK
The first time I tried to make an Easter charcuterie board I cried. Not elegant, single-tear crying, but full-on, why-is-there-prosciutto-on-the-ceiling sobbing. My friend Maggie walked in, took one look at my lop-sided pile of crackers and said, “It’s a board, not a coronation.” That was seven Easters ago, and now this board is what I make when I want people to feel special without me having to bake for three days. Okay, let’s be real — I still mess it up sometimes. But I’ve learned the small tricks that make a chaotic pile look intentional (and tasty). Trust me on this: if I can do it, you can. Don’t do what I did the first time — arrange the items before the wine, not after.
THE “WHY THIS MATTERS”
Here’s the thing: an Easter charcuterie board isn’t just food. It’s the easiest way to gather people, start chatter, and make a table look like you’ve been planning for hours when really you popped into Tesco at 3pm. Full disclosure: it’s what I serve when I’m too tired to cook but want the house to smell like it’s hosting a proper spring get-together. The colours, the textures, the salty-meets-sweet bits — they do emotional work. Maybe it’s just me, but watching someone reach for the first slice of cheese feels like applause. Learn from my mistakes and make it feel effortless.
THE “BEFORE YOU START” SECTION
- If you only have one nice cheese instead of three, you’re fine. Bigger slices look more intentional than tiny slivers (and fewer things to worry about).
- The one tool that makes this infinitely easier: a small sharp knife and a pair of kitchen tweezers (or chopsticks) for delicate placement. Yes, really. (They’re probably in your drawer.)
- If your toddler starts melting down at step 3 (I’ve been there), set them up with a small bowl of grapes and let them ‘build’ — instant distraction.
- Pour something you like. I grab a chilled bottle of Sauvignon Blanc or, if it’s raining — which, let’s be honest, it often is at Easter — a pot of mint tea for non-drinkers.
THE INGREDIENTS LIST WITH PERSONAL NOTES
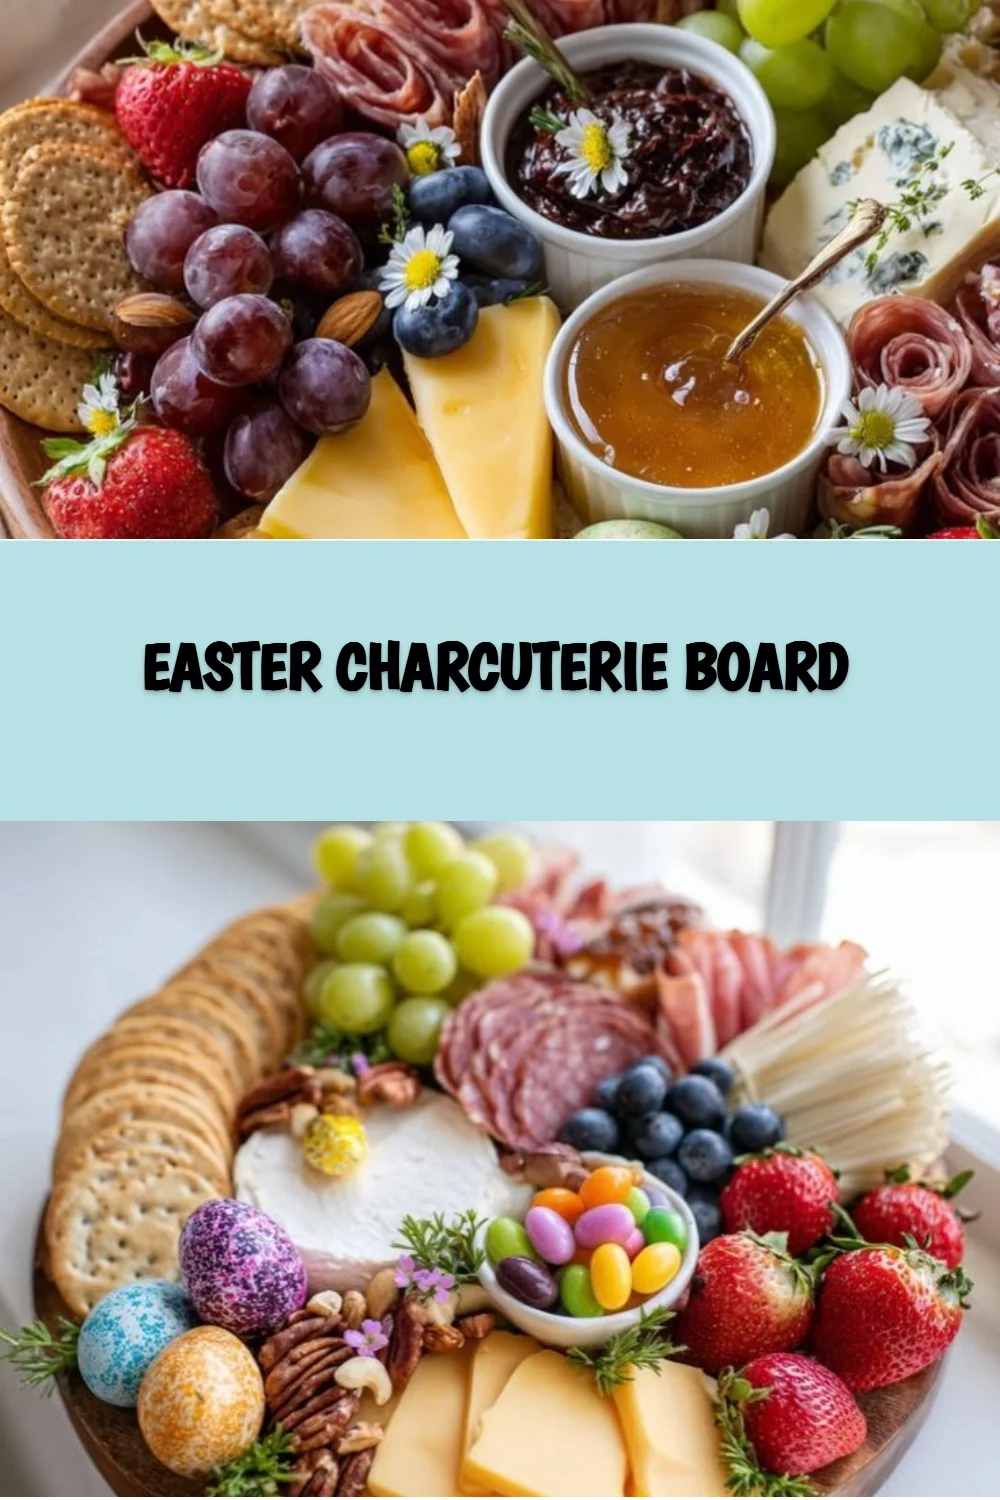
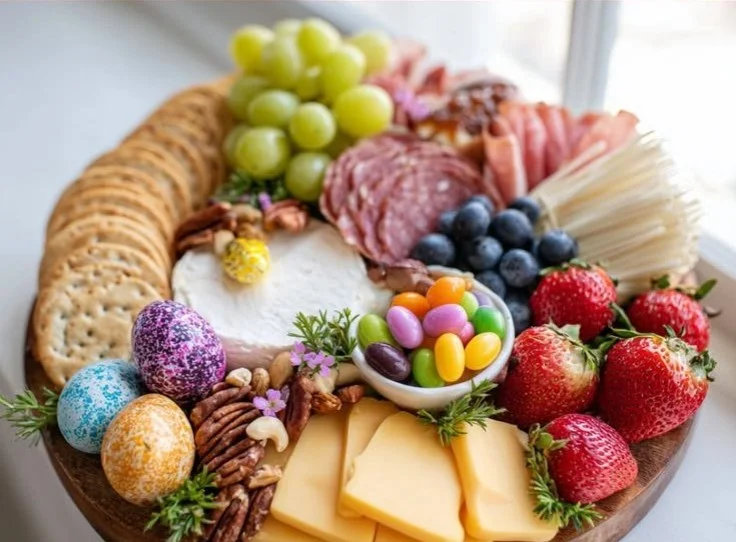
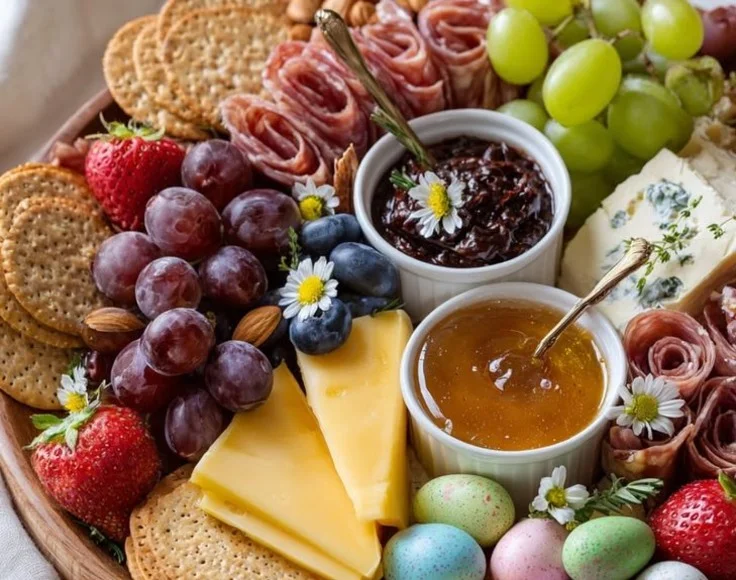
- 200g mature cheddar, sliced (I buy Tesco value when I’m being thrifty; no shame — it still melts in your mouth).
- 150g Brie, left whole (soft, creamy — I let it breathe on the counter for 20 minutes so it smells like spring).
- 100g goat’s cheese log (crumbly and tangy; my mum, Joan, calls this “the posh cheese”).
- 100g prosciutto, folded (delicate, salty — don’t scrunch it, fold it like little roses).
- 100g salami slices (I pick a spicy one if I’m feeling bold).
- 1 small pot of hummus (store-bought; Heinz ketchup has nothing to do with it, but yes, I use branded things).
- 1 jar good chutney or fig jam (the sweet counterpoint — trust me).
- A handful of cornichons and olives (I eat the olives straight from the jar sometimes, guilty).
- A small bunch of grapes, washed (green and purple for colour).
- 1 apple, thinly sliced (dunk in lemon water to stop browning if prepping early).
- A few strawberries (spring colours; I buy them when they’re on offer).
- A small bunch of baby carrots or radishes (for crunch and colour).
- Crackers and a baguette, sliced (I toast slices lightly when I can; the smell is impossible to resist).
- A handful of nuts — roasted almonds or walnuts (optional but important for crunch).
- Fresh herbs — rosemary sprigs and mint (rosemary smells like an Easter wreath; I tuck sprigs in for aroma).
- Edible flowers (optional but pretty; only if you’re sure they’re food-safe).
- Decorative extras: mini chocolate eggs or pastel jelly beans (kids lose their minds over these)
- Optional: a small dish of honey (for drizzling on cheese — heavenly).
THE STEP-BY-STEP WITH STORIES
- Lay your base.
- Practical Instruction: Choose a board — wooden if you have one, or a clean chopping board. Wipe it down.
- Why this step matters: The board is your stage. A messy stage will read as messy show.
- Human Insight: Chunky wood hides smears. Glass looks pretty but shows everything (crumbs, juice, my fingerprints).
- Anecdote: I once used my baking tray because I couldn’t find a board. My guests didn’t care, but I felt awkward. Don’t be me.
- Start with the big shapes.
- Practical Instruction: Place the cheeses first — whole Brie, wedge of cheddar, goat cheese log. Space them out.
- Why: Large items anchor the eye and create natural pockets for other stuff.
- Common mistake: Crowding cheeses in one corner (I did this once; the board looked like a greasy sandbank).
- Sensory cue: Let Brie sit out 15–20 minutes — you’ll smell creaminess and see a slight softness at the edges.
- Add bowls for wet things.
- Practical Instruction: Put small bowls for hummus, chutney, and honey around the cheeses.
- Why: It keeps wet/sticky items from making crackers soggy.
- Multi-tasking tip: Do this while the kettle boils for tea. Two jobs, one break.
- Meat next — fold, don’t pile.
- Practical Instruction: Fold prosciutto and salami into little ribbons or cones and tuck them near cheese.
- My hack: Use muffin tins to pre-fold meat if you’re nervous (weird? yes. Helpful? also yes).
- Anecdote: My friend Pete once smashed a jar of chutney while trying to arrange meat. He now uses the muffin trick.
- Fill with fruit and veg for colour.
- Practical Instruction: Put grapes in clusters, fan apple slices, scatter strawberries.
- Why: Colour draws people in and balances savoury salt with sweet.
- Sensory cue: Grapes should feel firm; strawberries should smell sweet.
- Add crackers and bread.
- Practical Instruction: Stack crackers vertically or fan them out; lean bread slices against a cheese wedge.
- Common mistake: Laying everything flat in one line (boring). Height creates drama.
- Personal hack: Toast bread briefly and brush with a little olive oil — smell alert. Trust me — your house will suddenly feel more like a bistro.
- Sprinkle nuts and small bites.
- Practical Instruction: Scatter nuts, cornichons, olives, and chocolate eggs to fill gaps.
- Why: These little items give different textures and make the board feel abundant.
- Anecdote: I always hide a small stash of chocolates near the edge for “emergency sugar” (Maggie knows and always finds them).
- Finish with herbs and a focal piece.
- Practical Instruction: Tuck rosemary sprigs and mint around the board. Put any decorative item (like a small bunch of flowers) off to the side.
- Why: Herbs bring aroma and visual cohesion. Rosemary especially makes people inhale.
- Sensory cue: Give it a sniff. If it smells like a garden, you’re winning.
- Step back and edit.
- Practical Instruction: Take a quick photo (for the family chat) then remove anything that looks lonely or sad.
- Why: Editing makes it look curated, not cluttered.
- Human Insight: This is the step where you save the whole thing. Trust your eye. If you think something’s wrong, move it.
- Serve with instructions (optional).
- Practical Instruction: Put little labels if you want — “Cheddar” “Brie” “Honey” — or just let people explore.
- Why: Some guests like to know. Others just want to grab and go.
Throughout: Keep a bowl for discarded strawberry leaves and olive pits. Don’t be gross and set them on the board. Learn from my mistakes — I’ve cleaned jam and olive pits off a board mid-party.
THE “TROUBLESHOOTING REAL LIFE” SECTION
- If something runs out mid-party: Rip a few slices of bread and serve with cheese. People will forgive you. I promise.
- If your Brie is too hard: Microwave for 10–15 seconds (on a low setting) and let it sit — it softens nicely. Full disclosure: I’ve nuked Brie in emergencies.
- If your crackers went soft (ugh): Pop them in a 150°C oven for 5 minutes to crisp them back up. It works like a small miracle.
- If you burn the bottom (e.g., of a toasted loaf): Cut off the worst bits and rearrange them on the board — disguised. No one will notice unless you mention it.
- Out of olives? Substitute with pickled shallots or even a spoon of capers. My neighbour John once brought pickled grapes and it somehow worked.
- Need to pause because of a toddler/work call/doorbell: Cover the board lightly with a large plate and pop it in the fridge for up to an hour. When you reopen it, rearrange a few bits so it looks fresh.
- If it’s just not working: Order a small platter from a local deli and slap on your fresh elements — herbs, fruit, and a couple of home-made touches — and call it a successful pivot. No shame in a tactical retreat.
THE SERVING STORY
I serve this on my long farmhouse table when I want the room to feel like a hug. I use a big wooden chopping board and a few small ceramic dishes (my go-to is a cheap set from a local market). The perfect side? A simple green salad with lemon dressing. But I’m not gonna lie — sometimes we eat straight from the board while standing by the window, watching kids hunt for hidden mini eggs in the garden. Leftovers are the best; cheeses mellow overnight and crackers do that lovely chewy thing. If there are any leftovers, I wrap them separately — no one wants wet crackers beside jam.
THE “WHEN I MAKE THIS” STORY
I usually make this on Good Friday because it gives us something light but celebratory after lent (and, honestly, because I’ve been cooking heavy all week). While it comes together, I fold the laundry (yes, domestic glamour) and call my sister Liz to compare who found the best bargain cheese. We eat at the coffee table sometimes — I’m not precious — but on nicer days we set it up outside. The cleaning? About 10–15 minutes if everyone’s helpful. If not, 30. The mess is worth it. Maybe it’s just me, but the sound of a guest unwrapping prosciutto is the best part.
THE CONVERSATIONAL CLOSE
Can we talk about how charcuterie boards make even the most chaotic host look prepared? The secret nobody tells you is that the board loves a little mess; it’s forgiving. I’m not gonna lie — I still tuck a rogue cracker behind a cheese and call it styling. Okay, let’s be real: I eat the rosemary sprigs when no one’s looking. Don’t do what I did once (arrange the board, then clean the kitchen for an hour) — serve sooner and relax. I’d love to hear if you make it — tag me or text a photo to Maggie and I’ll compare notes. What’s your go-to Easter nibble? Mine changes, but right now it’s the fig jam-and-goat-cheese combo.
FAQ
Q: How far ahead can I prep the board? A: Most items can be prepped a few hours ahead. Slice apples and dunk them in lemon water to stop browning. Keep wet items in bowls and assemble within an hour for best-looking results.
Q: Can I make a vegetarian version? A: Absolutely. Swap meats for roasted vegetables, marinated artichokes, falafel balls, or extra nuts and cheeses. The idea is variety in texture and flavour.
Q: Any tips for travelling with a board? A: Pack cheeses wrapped in parchment, chutney in sealed jars, and assemble on-site. Use a cooler for anything that needs refrigeration.
Q: What’s the budget way to make this look expensive? A: Use a few higher-impact items (good jam, a decent cheese, fresh herbs) and bulk up with cheaper staples (Tesco value cheddar, seasonal fruit). Presentation is half the magic.
Conclusion
If you want a step-by-step photo guide to arranging a spring-themed platter, this is a lovely extra resource: How to Make A Spring/Easter Charcuterie Board! For a different take with vegan options and bright, colourful ideas, check out Easter Charcuterie Board – Heartbeet Kitchen.
Thanks for sticking with me. Learn from my mistakes, laugh at my prosciutto-on-the-ceiling story, and make something that makes you and your people smile.

Easter Charcuterie Board
Ingredients
Method
- Lay your base by choosing a wooden board or a clean chopping board and wipe it down.
- Start with the big cheese shapes: Place the cheeses first, spacing them out.
- Add small bowls for wet items like hummus, chutney, and honey around the cheeses.
- Fold prosciutto and salami into little ribbons or cones and tuck them near cheese.
- Fill the board with fruit and veg for color, clustering grapes and fanning apple slices.
- Add crackers and bread by stacking or fanning them out.
- Sprinkle nuts and small bites, filling gaps with cornichons, olives, and chocolate eggs.
- Finish with herbs for aroma and tuck rosemary sprigs and mint around the board.
- Step back and edit the board, removing anything that looks lonely or sad.
- Serve with optional little labels for items like 'Cheddar' or 'Brie' or just let people explore.