Cake Pop Magic: Where Crumbs Meet Creativity
The first time I attempted cake pops, I didn’t just have a minor mishap; it was a complete baking catastrophe. Picture this: me, in a rickety kitchen, flour everywhere. Not only was there flour on the counter, but somehow it found its way into my hair and, I’m pretty sure, my dog’s fur. My kids walked in with snack-hungry eyes only to be met with the sight of melted chocolate, crumbled cake, and me standing there, hands on my hips, glaring at the mess as if it were a living creature. As my husband leaned against the doorframe, chuckling, he said, “Well, at least you’re not setting anything on fire.” (Trust me; I’ve done that too.) That fiasco happened years ago; now, cake pops are my secret weapon when I want to impress a crowd – be it kids, adults, or just my inner self craving a bit of creative therapy.
These little gems, with their sugary coats and oh-so-satisfying bite, have become what I whip out for every event, from birthday parties to random Tuesday afternoons. Forget about those Pinterest-perfect images; this journey to cake pop mastery is about embracing the mess, learning from every disaster, and finding joy amidst the chaos.
Why This Matters
These cute little cake pops are more than just a sweet treat. They’re like little parcels of joy, wrapped up in nostalgia and creativity. Maybe you’ve had one of those days when the universe seems to conspire against you. I certainly have. This is the recipe to make the world feel a bit brighter, a bit sweeter. Trust me on this: cake pops can heal. They’re the perfect antidote for a bad day, a surprising hit at parties, and a fun way to get the kiddos involved in the kitchen. Honestly, they’re what to make when everything else in your life has gone haywire and you just need a quick win.
Okay, let’s be real. They can be a bit finicky, and if you don’t have patience, they might just test your sanity. But hang in there with me. They’re worth it. You’ll feel like a superhero when you present a plate of these sweet little balls of love.
Before You Start
- If you think you’re short on time: Don’t worry! You can make these in parts. Bake the cake one day and assemble the pops the next. It’s about breaking it down – we’re all busy, right?
- The one tool that makes this infinitely easier: A cookie scoop. Honestly, it’ll save your life, particularly when trying to form those perfectly-sized little balls.
- What to do if your toddler starts melting down at step 3: I get it; my kiddo usually decides it’s time to become a tornado just as I’m melting chocolate. Just give them some sprinkles to play with as a distraction.
- And if you fancy a bit of a grown-up moment: Grab a glass of red wine while you work. Just a little something to sip on while you dabble in cake pop magic doesn’t hurt, right?
Ingredients List with Personal Notes
- 1 standard box of cake mix (I’m partial to Tesco’s Devil’s Food Cake because it’s cheap and so darn good)
- 3 eggs (ok, if you use two because you’re feeling wild, trust me, it’ll turn out just fine)
- ½ cup vegetable oil (I’ve also used melted butter when feeling fancy; living on the edge, I know!)
- 1 cup water (well, if you use milk, it’s a tad richer – but we don’t always have it on hand, do we?)
- 1 tub of frosting (store-bought is a lifesaver, but if you have a family recipe, bless your soul; use that instead!)
- 1-2 bags of chocolate melting wafers (whatever brand you like – I buy Wilton for convenience)
- Sprinkles (the more, the merrier; honestly, if there’s a sprinkle shortage, I’ll call the UN)

Step-by-Step with Stories
Step 1: Bake the Cake
Practical Instruction:
Start by preheating your oven to 350°F (175°C). Grab a large mixing bowl and combine your cake mix, eggs, oil, and water. Whisk it until it’s smooth. Pour it into a greased 9×13 baking pan.
Why This Step Matters:
You want to get the moisture right, my friend. A dry cake means dry pops, and nobody wants a mouthful of sadness.
Common Mistake Here:
A big mistake is overmixing. Just trust me—mix until combined and leave it be. Your wrist isn’t a workout machine, okay?
Personal Hack:
When I’m feeling particularly lazy, I put my baking pan straight on a baking sheet. Less mess equals a happy me.
Anecdote:
I usually bake this while pretending to be on a cooking show—complete with commentary that only my dog listens to.
Step 2: Let It Cool
Practical Instruction:
Once your cake is baked, let it cool completely. I know this feels like forever. Just give it a good hour, even two.
Why This Step Matters:
If you do this while it’s still warm, you’ll have crumbles in your hands and not cake balls. Trust me, it’s a tragedy you don’t want to endure.
My Personal Hack:
Stick it in the fridge for a quicker cool down. It’s like a little cake time-out.
Anecdote:
This is usually when I wrestle with my conscience over whether I should have a slice or not. Spoiler alert: I usually do, if only to ‘test’ the cake.
Step 3: Crumble and Mix
Practical Instruction:
Once the cake has cooled, crumble it into a large bowl. Now add about ¾ of your frosting. Start mixing with your hands. Yes, your hands.
Why This Step Matters:
You want the mixture to be moist enough to hold together—to mold into a ball that doesn’t fall apart.
Common Mistake Here:
Adding too much frosting! I know it’s tempting. You don’t want a goopy mess. Less is more.
Anecdote:
Every time I do this step, my kids come up and act like they’re doing a science experiment, trying to guess how many cake pops we’ll end up with. Spoiler: As many as I can eat.
Step 4: Forming the Cake Balls
Practical Instruction:
Using your handy cookie scoop, portion out the mixture and roll them into balls, about the size of a golf ball.
The Sensory Cue:
You’ll know they’re ready when they hold together without crumbling. Also, if you lick your fingers and it tastes like rich chocolate goodness.
My Personal Hack:
You can keep a bowl of water nearby to wet your hands. This keeps the mixture from sticking too much.
Step 5: Chill the Cake Balls
Practical Instruction:
Place the cake balls on a baking sheet lined with parchment paper. Pop them in the fridge for about an hour.
Common Mistake Here:
Skipping this step. Cake pops that aren’t cold result in melted chocolate disasters. And, trust me, the heartbreak is real.
Anecdote:
This is when I start planning my next baking adventure – usually something way over the top that I’ve probably no business attempting.
Step 6: Melting the Chocolate
Practical Instruction:
Now, melt your chocolate wafers according to the package instructions – a microwave works wonders here!
Why This Step Matters:
This is how you’ll coat your cake pops. Smooth, melted chocolate means a shiny finish.
Anecdote:
I’ll admit I sometimes melt too much and end up with a whole bowl leftover, which I inevitably eat by the spoonful, because who can resist melted chocolate?
Step 7: Dip and Decorate
Practical Instruction:
Carefully dip the cake balls into chocolate, using a fork to allow any excess to drip off. Stick a lollipop stick in each one and place them upright in a styrofoam block or cup.
Anecdote:
This is when my kids like to come and wear their most dubious faces, questioning why these are “so tiny” compared to the ones they see online. I assure them it’s because I’m “just keeping things real.”
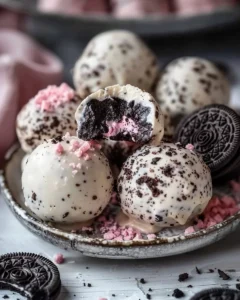
Step 8: Add Sprinkles
Practical Instruction:
While the chocolate is still wet, sprinkle them with your desired toppings. Go wild!
Personal Quirk:
Sometimes I go a bit sprinkle-crazy and end up with a mini snowstorm on my cake pops. Who says grown-ups can’t be silly?
Troubleshooting Real Life
- If you burn the chocolate: Don’t throw it out. Add a splash of vegetable oil to thin it out—if it’s salvageable, it usually is.
- If you need to pause because the doorbell rings: Just pop those cake balls back in the fridge until you’re ready. No rush.
- If it’s just not working: Honestly, don’t sweat it. Order a batch from the local bakery and save yourself the grief.
The Serving Story
I serve these little beauties in a glass jar for that something extra. It adds a nice touch, and you could even stick a few sprigs of mint on top just to mess with people. My husband always loves to place them out all lined up for parties, and I assure him it’s the wreath effect or something equally frivolous.
Leftovers? Ha! In theory, they taste even better after a day in the fridge, as the flavours mingle. But, if I’m being honest, there’s rarely a leftover situation at our house.
When I Make This
As for me, I usually make cake pops on Sunday evenings because we host a lazy movie night. While they chill, I get to fold laundry, catch up on The Great British Bake Off, and channel my inner contestant. This is a chaotic dance, interspersed with laughter and the occasional cry of "The dog got into the chocolate again!" (who, yes, tried to be my tasting partner). We eat them on the coffee table, surrounded by crumbs and the remnants of family time.
Sure, cleanup takes a solid 20 minutes, but honestly, sometimes it’s worth every speck of chocolate goo I have to scrub off.
The Conversational Close
This recipe has seen me through many random gatherings, small joys, and even a couple of tough days. It might not be perfect shaped cake pops every time, but knowing they’re made with love (and maybe some frazzled cursing) always makes them feel right. I’m here for that warm, lovely kitchen magic on days when I feel like chaos reigns.
I’d love to hear if you give these a go – tag me with your creations or simply enjoy them in your kitchen chaos. What’s your go-to snack that makes a bad day feel brighter? For me, it just might be these delicate little indulgences.

FAQs
-
Can I use a different type of cake mix?
Absolutely! I’ve used vanilla and red velvet, too. -
How long will these last?
If you can resist them, they should last about a week in the fridge. But let’s be real, they’re often gone within a day. -
Can I make these gluten-free?
Sure thing! Just grab a gluten-free cake mix, and you’re good to go.
So, there you have it! Cake pop magic, all wrapped up in a lovely little story! Enjoy.

Cake Pops
Ingredients
Method
- Preheat your oven to 350°F (175°C). In a large mixing bowl, combine your cake mix, eggs, oil, and water. Whisk until smooth and pour into a greased 9x13 baking pan.
- Let the cake cool completely for about 1-2 hours for it to be workable.
- Crumble the cooled cake into a large bowl and mix in about ¾ of the frosting using your hands until the mixture is moist enough to hold together.
- Using a cookie scoop, portion out the mixture and roll them into balls about the size of a golf ball.
- Chill the cake balls on a baking sheet lined with parchment paper in the fridge for about an hour.
- Melt the chocolate wafers according to the package instructions.
- Carefully dip each cake ball into the melted chocolate, using a fork to let excess chocolate drip off. Insert a lollipop stick into each one and place upright in a styrofoam block or cup.
- While the chocolate is still wet, add your desired toppings and sprinkles.