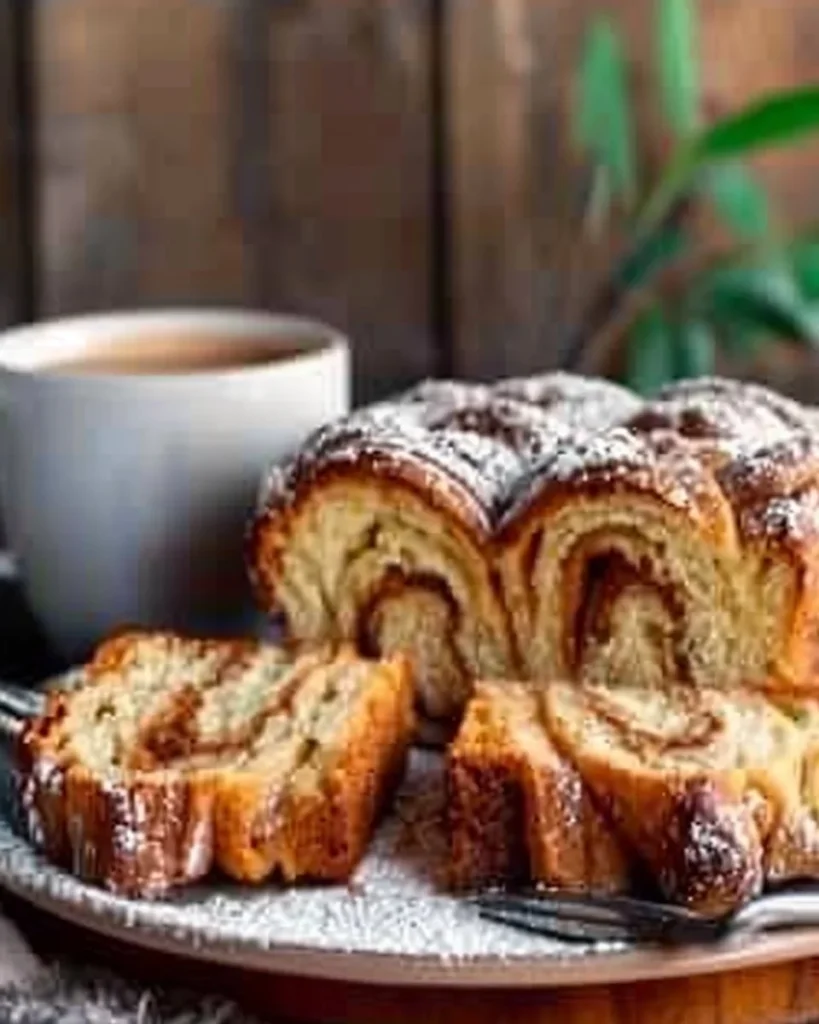
Gluten Free Cinnamon Pull-Apart Bread: A Comforting Kitchen Adventure
The Emotional Hook
The first time I tried making gluten-free cinnamon pull-apart bread, I honestly thought it might end in disaster. Picture this: I’m in my small kitchen, flour dust swirling around like confetti at a poorly thrown party. It was a chilly autumn afternoon, and I’d just gotten over a nasty cold. I figured that baking would be a good way to lift my spirits. Instead, I found myself in a sticky situation—literally. I was knee-deep in dough that stubbornly clung to my hands like a new puppy. My son, Oliver, wandered in looking for a snack and took one look at the chaos. Without missing a beat, he quipped, “Mum, is that dough supposed to be on the ceiling?”
(Ever since that day, it’s become a family joke. Trust me on this—kitchen humour is a must-have ingredient!) That was several years ago, and now this gluten-free cinnamon pull-apart bread is my go-to recipe for cozy gatherings or when I simply need to feel a bit of warmth in my heart (and my stomach).
Why This Matters
This isn’t just any recipe; it’s a love letter to those comfort-filled moments that make us feel at home. You see, who doesn’t crave a warm slice of cinnamon goodness that’s free of gluten? This is what I whip up when I want to impress guests without breaking the bank or when the day has been a disaster and I need something cozy to cuddle up with while clutching a mug of hot cocoa. Not only does it evoke happiness and comfort, but it also whispers, “You’re allowed to indulge.”
Also, let’s not forget the sheer joy of pulling apart those gooey, cinnamon-laden pieces, right? It’s not just food; it’s an experience, a hug in bread form, if you will!
Before You Start
Okay, let’s be real—before we dive into this kitchen adventure, here are a few nuggets of wisdom to keep in mind:
-
Ingredient Swaps: If you only have all-purpose gluten flour instead of gluten-free flour, you can still make this bread. Just adjust the liquid amounts accordingly. However, it won’t be the same in terms of texture (I learned this the tough way!).
-
Humble Tools: The one tool that makes this infinitely easier is a good stand mixer. Look, I get it—mixing dough by hand feels artisan, but if you’ve got a stand mixer gathering dust, now’s the time to shine that baby up!
-
Kid Meltdowns: If your little one (I mean, they always find you when you’re knee-deep in dough, don’t they?) starts melting down during step 3, just grab a handful of flour and let them ‘help’ sprinkle it while you work. Messy? Yes. Worth it? Absolutely.
-
Wine Pairing (or tea quitting): Trust me, this is the perfect time to pour a glass of your favourite red while you bake. If it’s that kind of day, reach for tea instead—the chai blends are especially soothing while your home fills with that cinnamon aroma.
Ingredients
Here’s what you’ll need, with my personal tips sprinkled throughout:
-
4 cups gluten-free all-purpose flour (I use Doves Farm as it’s versatile and smells heavenly)
-
2 tsp instant yeast (the magic behind the rise; I never use active dry because I can’t keep up with its mood swings)
-
½ cup granulated sugar (because happiness is granulated, right?)
-
1 tsp salt (I go for sea salt—an homage to my seaside holidays)
-
1 cup warm milk (dairy or plant-based; honestly, I’ve used both and love them equally)
-
½ cup unsalted butter, melted (the secret nobody tells you—it adds a richness that’s truly divine)
-
2 large eggs (room temperature, but if they come cold from the fridge, don’t sweat it; the warmth from the melted butter will take care of it)
-
2 tbsp ground cinnamon (because cinnamon is life; I’m not kidding)
-
1 cup brown sugar (the dark side; this makes all the difference for that caramel-like sweetness)
The Step-by-Step with Stories
Step 1: Mix the Dry Ingredients
Practical Instruction: In a large bowl, whisk together the gluten-free flour, yeast, granulated sugar, and salt.
Human Insight: Why this step matters: Mixing the dry ingredients helps to evenly distribute the yeast, ensuring that it activates properly when the wet ingredients join the party.
Anecdote: This is where I’d always run into trouble because I’d forget to whisk. I quickly learned that lumps mean unhappy bread. (Imagine being ‘that’ person with lumpy bread, ugh!)
Step 2: Combine Wet Ingredients
Practical Instruction: In a separate bowl, whisk the warm milk, melted butter, and eggs together.
Human Insight: Common mistake here: too-hot milk can kill yeast. If you’re not sure, trust your wrist—dipping a clean finger in should feel just warm, not hot.
Step 3: Make the Dough
Practical Instruction: Pour the wet mixture into the dry ingredients and mix well until a soft dough forms.
Human Insight: This is where the magic starts—you’re creating a soft cloud of happiness, and if it feels too sticky, sprinkle a little more flour (never fear, flour to the rescue!).
Anecdote: When I first tackled this step, I was so excited I nearly missed adding in the butter. “Just what I need!” I thought, “A rubbery loaf instead of delicious pull-apart bread.” But at least the resultant loaf tasted good, if not ideal!
Step 4: Knead the Dough
Practical Instruction: Turn the dough out onto a floured surface and knead for about 5-7 minutes until smooth.
Human Insight: This helps develop the gluten structure, or well, compensates for the lack of gluten in gluten-free flour. You want the bread to hold together nicely.
Anecdote: This is also when my kitchen becomes a mini workout zone, as I try to channel my inner bread-making goddess. Honestly, I used to dread this, but now I have a little dance party.
Step 5: Let It Rise
Practical Instruction: Place the dough in a greased bowl, cover it with a clean towel, and let it rise in a warm area for about an hour or until doubled.
Human Insight: If it’s chilly outside (I live in the UK; trust me, it’s often chilly), preheat your oven to about 30°C (not baking! Just warming), then turn it off and let the dough rise in there. It’ll thank you!
Step 6: Prepare the Filling
Practical Instruction: In a small bowl, mix the brown sugar and ground cinnamon together.
Human Insight: My personal hack: If you want to up the flavour, add a pinch of nutmeg or ginger. It’ll remind you of autumn, even in July!
Step 7: Shape the Dough
Practical Instruction: Once risen, punch down the dough (though I prefer to think of it as a gentle nudge) and roll it out into a rectangle.
Human Insight: Don’t stress about the perfect shape; I’m telling you, it’s all going to bake up beautifully, and besides, those uneven edges are character pizza slices waiting to happen!
Step 8: Fill and Cut
Practical Instruction: Brush the rolled dough with melted butter and sprinkle the cinnamon-sugar mixture evenly over the surface. Cut into strips, then stack those strips and cut into squares.
Anecdote: This is where my son loves to help—he’s my little stack master. He makes a game out of which slice can be tallest. (Silly little competitions abound in our kitchen; I’ve lost more than I’ve won!)
Step 9: Second Rise
Practical Instruction: Place the stacked squares in a greased loaf pan and let rise again for about 30 minutes.
Human Insight: Yes, there’s a second rise, and it’s crucial for fluffiness!
Step 10: Bake
Practical Instruction: Preheat your oven to 180°C and bake the bread for 35-40 minutes or until golden brown.
Human Insight: You’ll know it’s ready when your home smells like a cinnamon dream and it’s golden on top.
Troubleshooting Real Life
-
If you burn the bottom: Cover with foil and lower the temperature for a few minutes more.
-
If you need to pause: If the doorbell rings, simply cover the dough with a towel and leave it on the counter—it won’t hurt for a short time!
-
If it’s just not working: At this point, my go-to is usually a bike ride to the local bakery, shh don’t tell anyone!
The Serving Story
When it’s finally baked and cooled (okay, I normally dive into it straight from the pan—don’t do what I did the first time!), I serve this in a big wooden bowl we inherited from my grandmother. It sits on our kitchen island, and as a family, we gather around, pulling apart pieces while sipping hot apple cider. Sometimes we even inadvertently create a bit of a tug-of-war over who gets the biggest piece! Leftovers taste even better the next day (if they last that long), as they soak up all the deliciousness.
When I Make This
I usually whip this up on a Sunday afternoon; it’s that perfect prelude to winding down the weekend. While it cooks, I tend to pop a small load of laundry in (multitasking queen over here) or catch up on my latest podcast. We devour it at the dining table, candlelit if we’re feeling fancy, but most often nestled on the couch while binge-watching our family’s current TV obsession. The cleanup takes about 10 minutes, but it’s so worth it for the smiles that greet me with each golden pull-apart piece.
The Conversational Close
This gluten-free cinnamon pull-apart bread has seen me through countless cozy gatherings, rainy afternoons, and late-night snack cravings. It may not be perfect, but it’s mine—all rugged edges and delightful messiness that suit my life perfectly. I’d love to hear if you make it. Feel free to tag me in your attempts or just indulge quietly; either way, let’s embrace the joy of baking together!
So, what’s your go-to comfort food? Mine might change with the seasons, but right now, it’s this heavenly loaf of soft, cinnamon-infused magic.
Gluten Free Cinnamon Pull-Apart Bread
Ingredients
Method
- In a large bowl, whisk together the gluten-free flour, yeast, granulated sugar, and salt.
- In a separate bowl, whisk the warm milk, melted butter, and eggs together.
- Pour the wet mixture into the dry ingredients and mix well until a soft dough forms.
- Turn the dough out onto a floured surface and knead for about 5-7 minutes until smooth.
- Place the dough in a greased bowl, cover it with a clean towel, and let it rise in a warm area for about an hour or until doubled.
- In a small bowl, mix the brown sugar and ground cinnamon together.
- Once risen, punch down the dough and roll it out into a rectangle.
- Brush the rolled dough with melted butter and sprinkle the cinnamon-sugar mixture evenly over the surface. Cut into strips and then stack those strips and cut into squares.
- Place the stacked squares in a greased loaf pan and let rise again for about 30 minutes.
- Preheat your oven to 180°C and bake the bread for 35-40 minutes or until golden brown.